A properly installed bathtub drain is one of those home essentials most people never think about until something goes wrong. A slow gurgle, a pool of water around your feet, or a leak seeping through the ceiling below all point back to the same source: the drain assembly hiding beneath your tub. Whether you are replacing an older unit, finishing a bathroom remodel, or simply trying to understand what a plumber will be doing in your home, knowing how bathtub drain installation works can save you time, money, and frustration.
This guide walks through the tools, the step-by-step process, and the most common problems homeowners run into. It is written for real people living in real homes, especially older properties across Bucks County and the greater Philadelphia area, where aging pipework and quirky layouts can turn a simple swap into a weekend project.
Why Proper Bathtub Drain Installation Matters
The bathtub drain is more than just a hole in the tub. It is a sealed assembly that connects the tub to your home's waste system, controls when water stays in and when it flows out, and prevents sewer gases from drifting up into your bathroom. When any part of that system is installed poorly, the consequences tend to show up slowly, then all at once. Hidden leaks rot subfloors. Improper slope traps water. A missing or dry P-trap lets sewer odors into the living space.
Getting it right the first time protects your flooring, your framing, and your wallet. If you are weighing a DIY install against calling in a trusted local plumbing team, consider the cost of tearing out a freshly tiled floor six months later to fix a drip. The right hands, the right tools, and the right technique make the difference.
Tools and Materials You Will Need
Before starting any bathtub drain project, gather everything you need. Stopping mid-job to run to the hardware store is a classic frustration, and for a job involving water and wax seals, it can also mean redoing work.
Essential Tools
- Tub drain removal tool (also called a drain key or dumbbell wrench)
- Channel-lock pliers and an adjustable wrench
- Plumber's putty and silicone sealant
- PVC primer and cement (for plastic waste lines)
- Hacksaw or PVC cutter
- Tape measure and a small level
- Flashlight or headlamp for working under the tub
- Shop rag and a bucket for residual water
Materials and Parts
- New bathtub drain assembly (lift-and-turn, toe-touch, trip-lever, or push-and-pull style)
- Overflow plate and gasket
- Shoe fitting and tailpiece
- P-trap (usually 1-1/2 inch PVC or ABS)
- Rubber gaskets and mack washers
- Teflon tape for threaded connections
Step-by-Step Bathtub Drain Installation
The process below assumes you have access to the drain from below through a basement ceiling, crawl space, or an access panel. If your tub sits on a concrete slab, the work becomes significantly more involved and is almost always a job for a licensed professional.
Step 1: Shut Off Water and Prepare the Workspace
Turn off the water supply to the bathroom. Remove any standing water from the tub and lay down a drop cloth to catch debris. If you are replacing an existing drain, run a plunger a few times to push water out of the P-trap so it does not spill when you disconnect the line.
Step 2: Remove the Old Drain Assembly
Insert the drain removal tool into the drain opening, engage the crossbars, and turn counter-clockwise. Old drains often resist, especially in homes where the last installation used too much putty or where corrosion has set in. Next, unscrew the overflow plate from the opposite end of the tub and pull out the linkage or stopper mechanism. From below, loosen the slip nuts connecting the tailpiece to the P-trap and set the old waste-and-overflow assembly aside.
Step 3: Clean and Inspect
Wipe the drain flange area inside the tub with a rag to remove old putty, sealant, and grime. This is also the moment to inspect your subfloor and framing for signs of hidden water damage. Dark stains, soft wood, or a musty smell mean you have a larger issue to address before the new drain goes in. Calling for professional plumbing inspection at this stage can save thousands in future repair costs.
Step 4: Dry-Fit the New Waste and Overflow
Assemble the new waste and overflow pipe without glue or putty first. Position the shoe fitting under the tub drain opening and the overflow elbow behind the overflow hole. Check that everything lines up cleanly. You may need to trim the vertical overflow pipe with a PVC cutter to match your tub's height. A dry-fit saves you from cementing pipes that almost fit but not quite.
Step 5: Install the Drain Flange
Roll plumber's putty into a rope about the thickness of a pencil and press it around the underside of the drain flange. Thread the flange into the shoe fitting from above and tighten with your drain removal tool until putty squeezes out evenly around the rim. Do not overtighten as this can crack fiberglass tubs or split the shoe fitting.
Step 6: Attach the Overflow Plate
Position the rubber gasket between the overflow elbow and the tub wall, then insert the linkage (for trip-lever styles) or set up the stopper assembly. Secure the overflow plate with the provided screws, checking that the gasket is seated evenly to prevent leaks behind the wall.
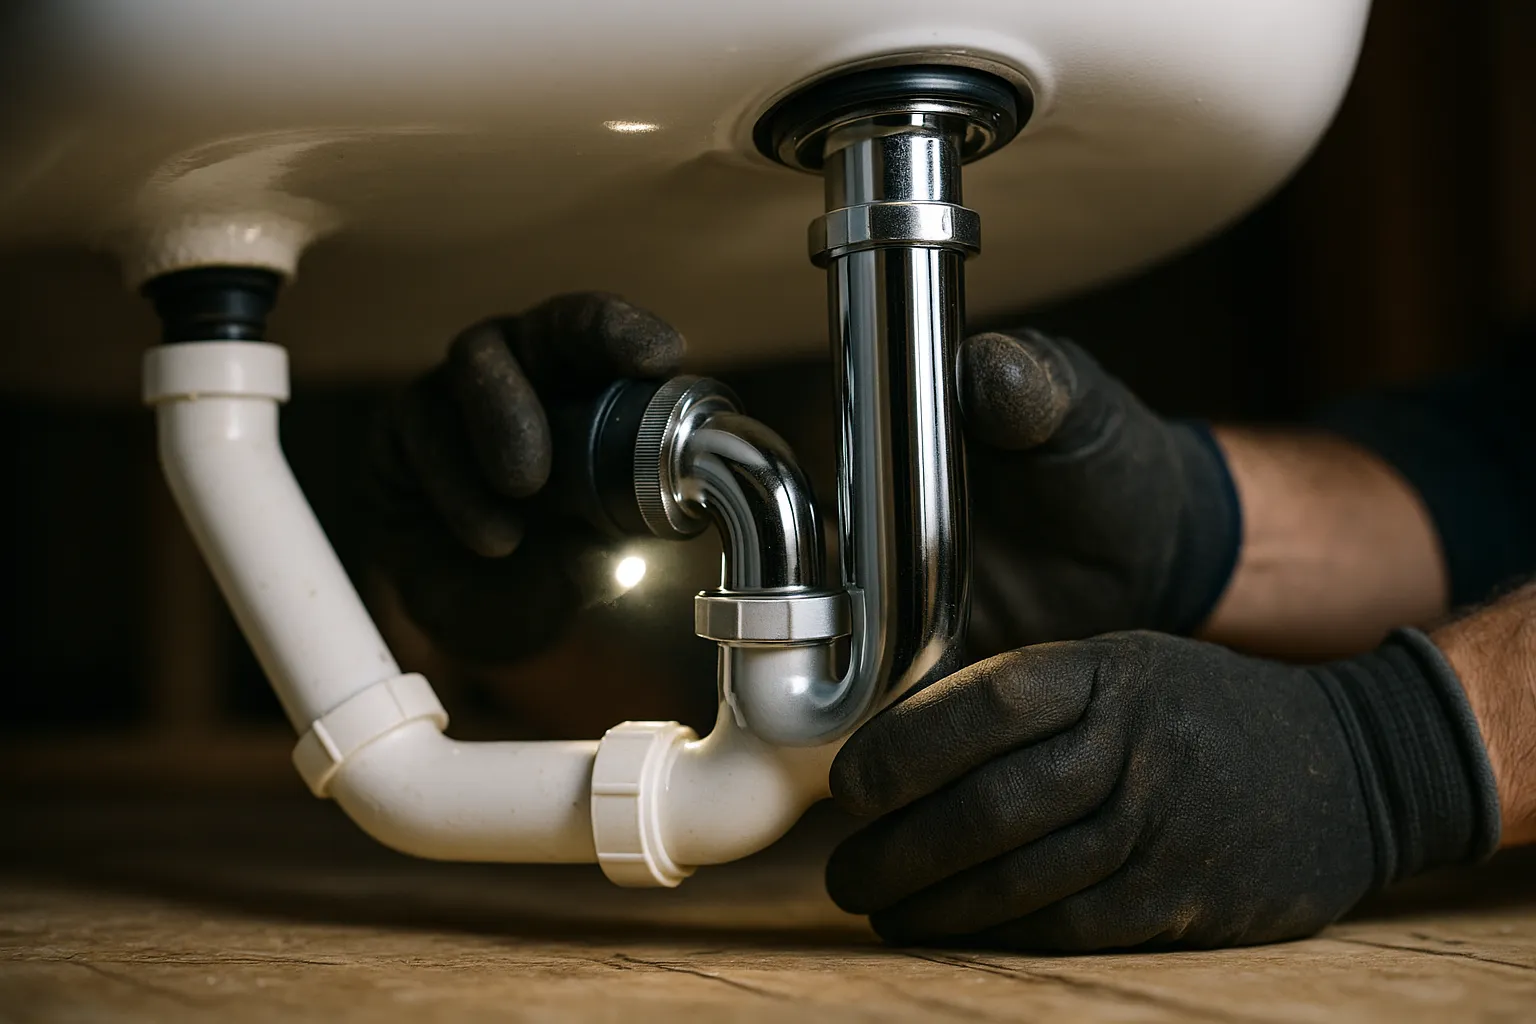
Step 7: Connect to the P-Trap
With the drain assembly installed, connect the tailpiece to the P-trap, then to the waste line. Hand-tighten the slip nuts first, then give them a final turn with channel-lock pliers. The P-trap must sit level and retain water, that water seal is what keeps sewer gases out of your bathroom.
Step 8: Test for Leaks
Restore the water, fill the tub a few inches, then pull the stopper. Watch every connection from below as the water drains. Slow drips can be hard to see, so use a dry paper towel to dab under each joint. A proper test means filling the tub completely, letting it sit for ten minutes, and then draining it with an observer underneath.
Common Bathtub Drain Problems and How to Troubleshoot
Even a textbook installation can run into problems. Here are the issues homeowners most often face and what they typically point to.
Water Drains Slowly After Installation
A fresh install should drain quickly and without gurgling. Slow drainage usually means the P-trap is not vented properly, or debris dropped into the line during installation. It can also mean the existing waste line has built-up buildup. If your home has older galvanized piping or is in a neighborhood with tree-root issues, the obstruction may sit further down the line. Expert sewer and pipe-clearing work can pinpoint whether the blockage is in your new assembly or somewhere deeper.
Leaks Under the Tub
Nine times out of ten, a leak after installation traces back to one of three things: a flange that was not tightened enough, a missing or cocked rubber gasket behind the overflow, or a slip-nut joint on the P-trap that was not fully seated. Shut off the water, dry the area, and check each connection in order from the tub down. If you cannot locate the source or the leak returns, it is time to bring in round-the-clock emergency plumbing help before water damage spreads to the floor below.
Sewer Smell From the Drain
A bathtub that smells like a sewer is almost always a P-trap problem. Either the trap has dried out (common in guest bathrooms used infrequently) or there is a crack or missing vent allowing gases to escape. Running water for a minute usually fixes a dry trap. A persistent smell means the vent stack or trap itself needs inspection. Homeowners across the local service region often find older homes have venting that no longer meets modern code, which can cause this exact issue.
Stopper Will Not Hold Water
If your lift-and-turn or toe-touch stopper does not seal, the seat washer is usually worn, the stopper is set to the wrong depth, or the linkage in a trip-lever style is out of adjustment. Most of these are simple fixes with the drain assembly still installed.
When to Call a Professional
DIY bathtub drain installation is achievable for many handy homeowners, but some situations call for experienced hands. Consider reaching out to a licensed contractor if you are dealing with any of the following.
- The tub sits on a concrete slab with no access from below
- You discover rotted subfloor or damaged joists during removal
- The existing drain line is cast iron or lead rather than PVC
- The rough-in measurements do not match your new tub
- You notice recurring clogs across multiple fixtures, which can point to a main-line issue such as sediment buildup inside your drain system
- You are combining the installation with a larger bathroom remodel
If you live in the Bucks County area and want the job handled right the first time, our experienced family-run team has been serving neighbors across the region since 1999. Homeowners in communities like nearby Lower Bucks neighborhoods count on us for honest assessments and clean, lasting work.
Trusted Bathtub Drain Installation in Bucks County
Whether you are mid-remodel or stuck with a leaking tub that will not wait, the team at FKRIV Plumbing & Heating Inc. is ready to help. As a fourth-generation, veteran-owned company with an A+ BBB rating, we bring decades of hands-on experience to every job. Visit our full list of residential and commercial offerings, learn more about our family story, or see what customers say on our reviews page. For a free consultation, call (215) 874-0592 today.