Replacing a bathroom sink or roughing in new plumbing can feel intimidating — but with the right tools, a little patience, and a clear plan, many homeowners can successfully tackle this project themselvescurved section of pipe.
Whether you're installing a brand-new vanity or reconnecting pipes after a renovation, understanding how the supply and drain sides work together makes all the difference.
This guide walks you through the entire process from start to finish, including the tools you'll need, how to connect supply lines, how to assemble the drain, and when it makes sense to call a licensed plumber instead of going it alone.
What You'll Need Before You Start
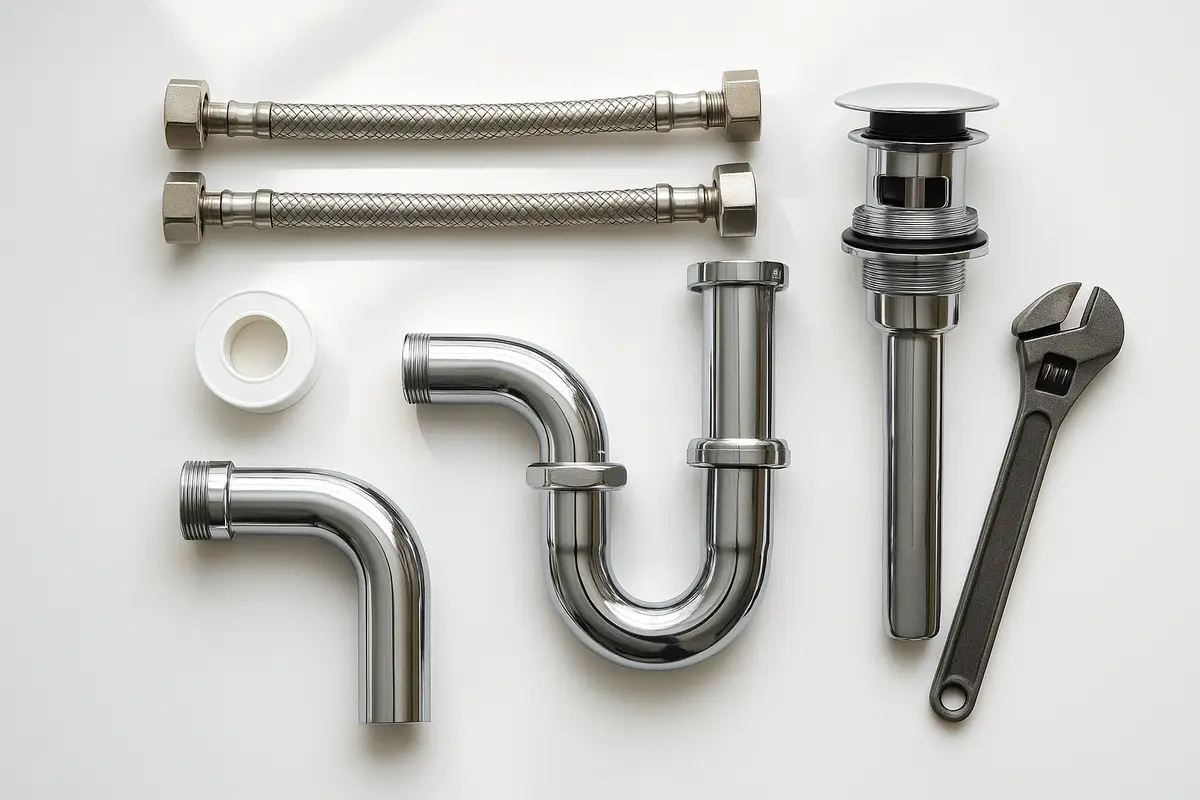
Gathering your materials before you get under the sink saves a lot of frustration. Here's a checklist of the basic supplies and tools for a standard bathroom sink installation:
Tools
- Adjustable wrench or basin wrench
- Pipe wrench
- Plumber's putty or silicone sealant
- Teflon tape (PTFE tape)
- Bucket and old towels
- Utility knife
- Drill or screwdriver
Materials
- Hot and cold supply lines (braided stainless steel recommended)
- P-trap assembly (1-1/4" or 1-1/2" depending on your drain)
- Pop-up drain assembly
- Shutoff valves (if not already present)
- Drain tailpiece and extension (if needed)
- Slip-joint washers and nuts
Step 1: Turn Off the Water Supply
Before touching any pipes, locate the shutoff valves under the sink and turn them clockwise until they stop. If there are no individual shutoff valves, you'll need to shut off the main water supply to the house. Turn on the faucet to release any remaining pressure and drain the lines completely.
This is also a good time to place a bucket under the P-trap — even with the water off, there's usually water sitting in that curved section of the drain pipe.
Step 2: Remove the Old Plumbing (If Applicable)
If you're replacing existing plumbing, start by disconnecting the drain. Loosen the slip-joint nuts by hand or with pliers and remove the P-trap. Have your bucket ready — water will spill out. Next, disconnect the supply lines from both the shutoff valves and the faucet inlets.
Inspect the shutoff valves at this point. If they're corroded, hard to turn, or more than 10 years old, it's worth replacing them now. A failing valve during a future leak can cause costly water damage.
Step 3: Install the Faucet and Drain Assembly
If you have a new faucet, now is the time to install it before setting the sink. It's much easier to access the mounting nuts when the sink is on a workbench rather than already mounted on the vanity.
Installing the Pop-Up Drain
Apply a rope of plumber's putty around the drain flange (the visible ring at the top of the drain). Press the flange firmly into the drain hole in the sink basin. From underneath, thread the drain body onto the flange and tighten the mounting nut. Wipe away any putty that squeezes out from the top.
If your faucet includes a pop-up stopper, connect the pivot rod through the drain body and link it to the lift rod that runs up through the faucet body. Adjust the clevis strap so the stopper opens and closes fully.
Step 4: Connect the Supply Lines
Braided stainless steel supply lines are the industry standard for bathroom sinks — they're durable, flexible, and easy to work with. Most come in standard 12-inch or 20-inch lengths.
Wrap the threads on the shutoff valve stems with two to three layers of Teflon tape before attaching the supply lines. Hand-tighten first, then give it a quarter turn with a wrench — don't overtighten or you risk cracking the valve body. Connect the other end of each supply line to the corresponding hot and cold inlets on the faucet. Hot water connects to the left; cold connects to the right.
Step 5: Assemble the Drain Trap
The P-trap is the curved section of pipe that holds a small amount of water at all times — this water seal blocks sewer gases from entering your home. Getting the trap lined up correctly is often the trickiest part of the job.
Understanding the Drain Assembly
The drain assembly runs from the bottom of the pop-up drain down through the tailpiece, into the P-trap, and then connects to the drain stub-out in the wall or floor. Each connection is sealed with a slip-joint washer and nut.
- Slide a slip-joint nut and washer onto the tailpiece (washer goes toward the drain).
- Insert the tailpiece into the drain body and tighten the nut hand-tight.
- Attach the curved section of the P-trap to the tailpiece with another slip-joint nut and washer.
- Connect the horizontal arm of the P-trap to the drain stub-out in the wall. If the trap arm is too long, cut it with a hacksaw.
- Tighten all slip-joint nuts snugly. Avoid overtightening plastic fittings.
For a more detailed look at how all the components work together, check out this helpful breakdown of bathroom sink plumbing and how each part functions — it covers flow, drainage, and venting in plain language.
Step 6: Test for Leaks
With everything connected, slowly open the shutoff valves and allow the lines to pressurize. Run the water and watch every connection point for dripping or seeping. Pay attention to:
- Supply line connections at the valve and faucet
- The base of the faucet where it meets the sink
- The drain flange where it meets the sink basin
- Every slip-joint connection along the P-trap and drain arm
Test the pop-up stopper by filling the basin and checking that it holds water without draining. Then pull the lift rod to open it and make sure it drains freely. If any connection is dripping, snug it up a bit more. A small hand-tightening adjustment often does the trick.
If you're noticing a slow drain or suspect blockage in the existing drain line, that's worth addressing. FKRIV offers professional drain clearing and pipe inspection services that can pinpoint the problem fast.
Common Mistakes to Avoid
- Don't skip Teflon tape: Even one missed threaded connection can cause a slow drip that goes unnoticed until it damages your cabinet.
- Don't overtighten plastic nuts: Hand-tight plus a quarter turn is all you need. Cranking too hard cracks the fitting.
- Choose the correct P-trap size: Most bathroom sinks use 1-1/4" traps, but some vanities are 1-1/2". Measure before buying.
- Make sure the drain arm slopes correctly: The horizontal arm must slope slightly downward toward the wall — a level arm or uphill slope leads to standing water and odors.
- Don't ignore venting problems: If you hear gurgling after draining, the drain may not be properly vented. This is a job for a licensed plumber.
If you're planning a larger bathroom renovation, you may also find it useful to review some bathroom plumbing layout ideas for modern homes before finalizing your design.
When to Call a Licensed Plumber
DIY sink installation works well when you're swapping out an existing fixture and the rough plumbing is already in place. But there are situations where you should it's best to call a licensed plumber:
- The shutoff valves are corroded, stuck, or leaking
- You're moving the sink to a new location and need to relocate drain or supply lines
- There's no vent pipe connected to the drain, causing gurgling or slow drainage
- You discover signs of pipe damage, water staining, or mold inside the cabinet
- The drain stub-out is cracked or the existing drain line is partially blocked
FKRIV Plumbing & Heating has been serving homeowners throughout Bucks County and Montgomery County for years. Whether it's a quick repair or a full fixture replacement, explore the full range of residential plumbing solutions available in your area to get a sense of how the team can help.
If you're dealing with a situation that goes beyond a simple swap — like discovering that your sump pit is overwhelmed or your hot water isn't recovering properly — it's good to know that those services are available too.
For broader home plumbing needs — including sump pump installation and maintenance to water heater replacement — FKRIV has the expertise and equipment to handle it all.
Keeping Your Bathroom Sink Plumbing in Good Shape
Once your sink is installed and working correctly, a little maintenance goes a long way:
- Run hot water for 30 seconds after use to flush soap and residue through the trap
- Clean the pop-up stopper monthly by pulling it out and removing any debris
- Check under the sink periodically for signs of moisture, drips, or mineral buildup on connections
- If water drains slowly, try a natural drain treatment before reaching for chemical drain cleaners
For tips on keeping your entire plumbing system running smoothly throughout the year, the year-round plumbing maintenance guide from FKRIV is a great resource for homeowners.
One area homeowners often overlook after a renovation is the water heater. If your new sink setup is exposing pressure fluctuations or you're noticing inconsistent hot water, it may be time to look into water heater installation or inspection to rule out a related issue.
Frequently Asked Questions
How long does it take to install bathroom sink plumbing?
For a straightforward swap where the rough plumbing is already in place, most homeowners can complete the job in two to four hours. If you're working in tight quarters or need to replace shutoff valves, plan for a half-day project.
Do I need to use plumber's putty or silicone on the drain flange?
Both work, but they serve different purposes. Plumber's putty is easier to remove if you ever need to replace the drain and is best for most standard sinks. Silicone provides a stronger, waterproof bond and is better for stone or composite sinks where putty could stain. Always check the sink manufacturer's recommendation.
What size P-trap does a bathroom sink use?
Most bathroom sinks use a 1-1/4" P-trap. Some vanities and older homes may use 1-1/2". Measure the drain tailpiece diameter before purchasing your trap to avoid a return trip to the hardware store.
Why is my drain gurgling after I installed the P-trap?
Gurgling usually means air is being pulled through the water in the trap due to improper venting. The drain may not be connected to a vent stack, or the vent could be partially blocked. This requires a plumber to diagnose and resolve properly — it's not something that can be fixed by adjusting the trap itself.
Can I use PVC pipe instead of chrome for the drain assembly?
Yes, white PVC drain pipes are perfectly acceptable and actually preferred by many plumbers because they're lightweight, easy to cut, and don't corrode. Chrome trap assemblies are often chosen for aesthetic reasons in open vanities. Both work equally well from a function standpoint.
How do I know if my shutoff valve needs to be replaced?
If the valve handle is stiff or won't fully close, if you notice mineral deposits crusted around the stem, or if it drips when closed, it's time for a replacement. Attempting to install new supply lines on a failing valve is likely to cause leaks later.
Serving Areas
FKRIV Plumbing & Heating proudly serves homeowners and businesses throughout Bucks County and Montgomery County, Pennsylvania — including Levittown, Yardley, and surrounding communities. Whether you need a hand finishing a sink installation or you're dealing with a more involved plumbing issue, our licensed team is ready to help.