A new kitchen sink can transform the heart of your home, but the plumbing beneath it is what keeps everything running smoothly. Whether you're replacing a worn-out fixture or tackling your first DIY project, getting the plumbing right matters — a sloppy install leads to slow drains, hidden leaks, and water damage that costs thousands to repair.
This guide walks you through the tools, techniques, and common missteps homeowners make when installing kitchen sink plumbing, so you'll know what the job involves and when it's worth calling in the pros.
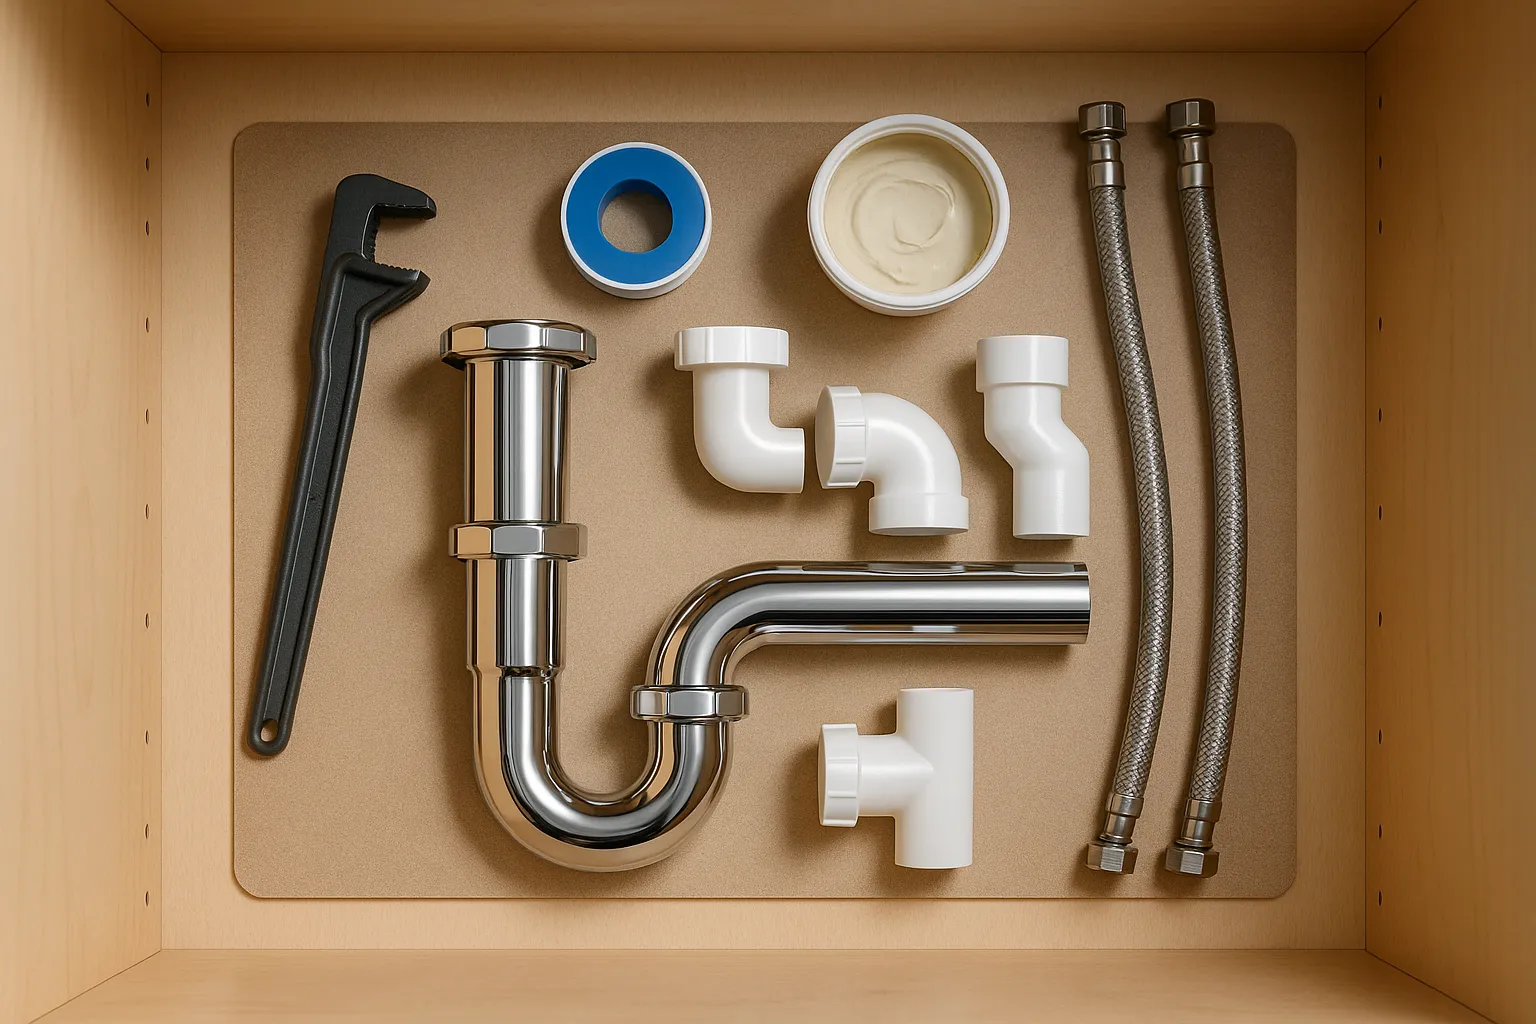
Tools and Materials You'll Need Before You Start
Before you pull out the old sink, gather everything you'll need. Running to the hardware store mid-project leads to shortcuts, and shortcuts lead to leaks. Here's the core toolkit for a standard kitchen sink install:
- Adjustable wrench and basin wrench — the basin wrench is essential for tightening nuts in tight spaces under the sink
- Channel-lock pliers — for gripping slip-joint nuts without damaging the finish
- Plumber's putty and PTFE (Teflon) tape — critical for creating watertight seals on threaded connections
- Hacksaw or PVC cutter — for trimming drain pipes to the correct length
- Bucket and old towels — residual water will drip, guaranteed
- P-trap assembly, tailpieces, and slip-joint nuts — usually sold as a complete kit
- Flexible supply lines — braided stainless steel lasts far longer than plastic
- Silicone caulk — for sealing the sink rim to the countertop
A bright flashlight or headlamp is worth its weight in gold — the area under a kitchen sink is cramped and dark, and small leaks hide for weeks before announcing themselves.
Step-by-Step Guide to Installing Kitchen Sink Plumbing
1. Shut Off the Water and Disconnect the Old Plumbing
Close the hot and cold shut-off valves under the sink, then turn on the faucet to relieve pressure. Place a bucket beneath the P-trap and loosen the slip nuts by hand or with pliers. Disconnect the supply lines, unclip the sink from underneath, and lift it out carefully.
2. Install the Faucet and Drain Assembly on the New Sink
It's far easier to attach the faucet and drain basket before dropping the sink into the countertop. Roll a thin rope of plumber's putty around the drain flange, press it into the sink opening, and tighten the locknut from below. Apply PTFE tape to the faucet's threaded connections and secure the mounting hardware snugly — but not so tight you crack the porcelain or deform the stainless steel.
3. Set the Sink and Connect the Supply Lines
Lower the sink into place, run a bead of silicone caulk around the rim, and clip or clamp it to the underside of the counter. Connect the braided supply lines to the faucet tails and then to the shut-off valves. Hand-tighten first, then give each connection a quarter-turn with a wrench — no more. Overtightening is one of the most common causes of long-term leaks.
4. Assemble the P-Trap and Drain Line
Dry-fit the P-trap and tailpiece before committing to any cuts. The trap should sit below the drain outlet with a gentle downward slope toward the wall stub-out. Tighten slip nuts by hand plus a small nudge with pliers — plastic threads strip easily under a wrench.
If your setup includes a dishwasher or garbage disposal, connect the dishwasher high loop or air gap before the disposal inlet to prevent wastewater from flowing back into the dishwasher.
5. Turn the Water Back On and Test Thoroughly
Slowly open the shut-off valves and check every connection. Run hot and cold separately, fill both basins, and let them drain while you watch the P-trap and supply lines for any sign of moisture. A single drop now can mean a puddle in the cabinet next month.
If you notice sudden drops in water pressure after the install, that usually points to a supply line issue or debris in the faucet aerator.
Pro Tips for a Leak-Free Kitchen Sink Installation
A few small habits separate a professional-quality install from a weekend headache. These are the details seasoned installers never skip:
- Always check that the P-trap is the correct size — 1-1/2 inch is standard for kitchen sinks, while bathroom sinks typically use 1-1/4 inch.
- Use PTFE tape on threaded metal connections and plumber's putty on flat flanges. Mixing them up is a common beginner mistake.
- Keep the drain pipe slope between 1/4 inch and 1/2 inch per foot. Too flat and water stagnates; too steep and solids outrun the water.
- Replace old corroded shut-off valves while you have the space opened up. They fail at the worst possible times.
- In hard-water areas like Bucks County, consider a water softener or filter upstream of the sink. Mineral buildup from hard water shortens the life of faucets, aerators, and supply lines.
Common Mistakes to Avoid During Installation
Even confident DIYers make the same handful of errors. Knowing what they are beforehand is the easiest way to avoid them:
- Overtightening connections. Plastic slip nuts crack, washers get crushed, and threads strip. Hand-tight plus a quarter-turn is almost always enough.
- Skipping the dry fit. Cutting PVC or tailpieces before test-fitting the whole assembly leads to wasted parts and awkward adjustments.
- Reusing old washers and gaskets. They're cheap for a reason — swap them every time.
- Forgetting the vent or air gap. Without proper venting, drains gurgle and siphon the P-trap dry, letting sewer gases into the kitchen.
- Ignoring local code. Pennsylvania homes have specific requirements for trap arm length, venting, and backflow prevention. A permit or inspection may be needed depending on the scope.
- Using the wrong drain configuration for double bowls. A center outlet tee with a single trap is standard — not two separate traps.
When It's Time to Call a Professional
Plenty of kitchen sink installs are within reach for a handy homeowner, but some situations call for a licensed pro. If you're moving the sink, replacing galvanized supply lines, dealing with corroded shut-off valves that won't budge, or integrating a disposal and dishwasher into an older drain system, the risk of getting it wrong climbs quickly.
A professional plumber can also spot issues you'd miss — undersized drain lines, improper venting, or supply pipes nearing the end of their life. For homeowners in Bucks County, our experienced plumbing technicians handle kitchen sink installations and upgrades every week.
If you're remodeling the whole kitchen, our full-service plumbing team can coordinate rough-in work for new supply and drain lines. And if you live further north, our local plumbing experts cover everything from emergency repairs to full sink replacements.
For larger projects involving aging pipes, we also recommend reading our upcoming guide on signs it's time to repipe your kitchen, and if you're planning a full renovation, our upcoming kitchen plumbing remodel checklist will walk you through budgeting, permits, and timelines.
Frequently Asked Questions
How long does it take to install kitchen sink plumbing?
A straightforward sink replacement typically takes 2 to 4 hours. If you're also installing a new faucet, garbage disposal, or adjusting the drain location, plan on a full day. Hidden issues like corroded valves or outdated drain lines can add significant time.
Do I need a permit to install a kitchen sink?
A straight swap of an existing sink usually doesn't require a permit. However, if you're moving the sink, altering supply or drain lines, or installing new fixtures like a garbage disposal, your township may require one. Check with your local code office before you start.
Should I use plumber's putty or silicone caulk?
Use plumber's putty for the drain flange where it seats against the sink, and silicone caulk around the rim where the sink meets the countertop. Some composite and stone sinks require silicone for the drain too — always check the manufacturer's instructions.
Why does my new kitchen sink drain slowly?
Slow drainage after a new install is almost always a slope problem. The drain pipe between the P-trap and the wall should angle downward at roughly 1/4 inch per foot. If it's flat or tilts the wrong way, water will pool and drain sluggishly.
Can I install a garbage disposal myself?
Yes, if you're comfortable with basic electrical work and plumbing. The unit needs a dedicated outlet or hardwired connection, proper drain plumbing with a tee fitting, and a dishwasher high loop if applicable. If you're not confident with the wiring, hire a licensed electrician or plumber.
What size drain pipe does a kitchen sink need?
Kitchen sinks use a 1-1/2 inch drain and P-trap. This is larger than a bathroom sink's 1-1/4 inch drain and handles the heavier food waste and dishwater flow without clogging as easily.
Final Thoughts
Installing kitchen sink plumbing the right way comes down to preparation, patience, and the small details — the slope of a drain pipe, the torque on a slip nut, the condition of a washer. Done well, a good install gives you decades of leak-free service. Done poorly, it can quietly damage your home for months before you notice.
If you'd rather skip the guesswork, FKRIV Plumbing & Heating Inc. is here to help. Our team has served homeowners across Bucks County since 1999. Call (215) 874-0592 to schedule a consultation or request a free quote.