A leaky or rusted kitchen sink drain is one of those problems that quietly gets worse until you finally open the cabinet and see the water damage. The good news is that replacing one is a manageable DIY project for most homeowners. With basic tools, the right parts, and about an hour of patience, you can stop the drip and get your sink draining like new.
This guide walks you through the whole process and covers when it makes sense to bring in a licensed plumbing professional to handle the job for you.
Why You May Need to Replace Your Kitchen Sink Drain
Kitchen sink drains take a beating from hot water, grease, food particles, and mineral buildup. Consider a replacement when you notice:
- Persistent leaking under the sink, even after tightening the slip nuts
- Visible rust, cracks, or corrosion on the strainer basket or tailpiece
- Standing water around the drain opening or putty oozing from the rim
- A musty smell coming from inside the cabinet
- Slow drainage that returns soon after you clear the line
If your drain keeps clogging on top of these symptoms, the problem may extend deeper into the line. A professional drain cleaning service can clear the blockage and confirm whether a full replacement is the right call.
Tools and Materials You Will Need
Lay everything out within arm's reach before you start. Few things are more frustrating than crawling out from under the sink because you forgot a wrench.
Tools:
- Channel-lock pliers or a basin wrench
- Adjustable wrench
- Screwdriver (Phillips and flathead)
- Putty knife or plastic scraper
- Bucket and old towels
- Flashlight or work light
Materials:
- New kitchen sink drain assembly (strainer basket, locknut, rubber gasket, friction ring)
- Plumber's putty or silicone sealant
- Replacement tailpiece and slip nuts (if the originals are worn)
- Teflon tape for threaded connections
Take a photo of your existing setup before you start. It is the easiest way to remember how everything fits back together.
Step-by-Step: How to Replace a Kitchen Sink Drain
Step 1: Shut Off the Water and Clear the Area
Turn off the hot and cold supply valves under the sink. Bumping the supply lines in tight quarters can cause a bigger mess than the drain itself. Empty the cabinet and place a bucket directly under the P-trap to catch any standing water.
Step 2: Disconnect the P-Trap and Tailpiece
Loosen the slip nuts on either side of the P-trap by hand or with channel-lock pliers. Slide the trap off and dump any water and debris into the bucket. Then disconnect the tailpiece, which is the straight pipe running from the bottom of the strainer to the trap. Set everything aside.
Step 3: Remove the Old Strainer Assembly
Find the large locknut underneath the sink that holds the strainer basket. Loosen it with channel-lock pliers or a basin wrench. If it is stuck, apply penetrating oil and wait a few minutes. Hold the strainer basket from above to keep it from spinning, then unscrew the locknut completely.
Lift the old strainer out and use your putty knife to scrape away any old putty or sealant. The cleaner this surface, the better your new seal will hold.
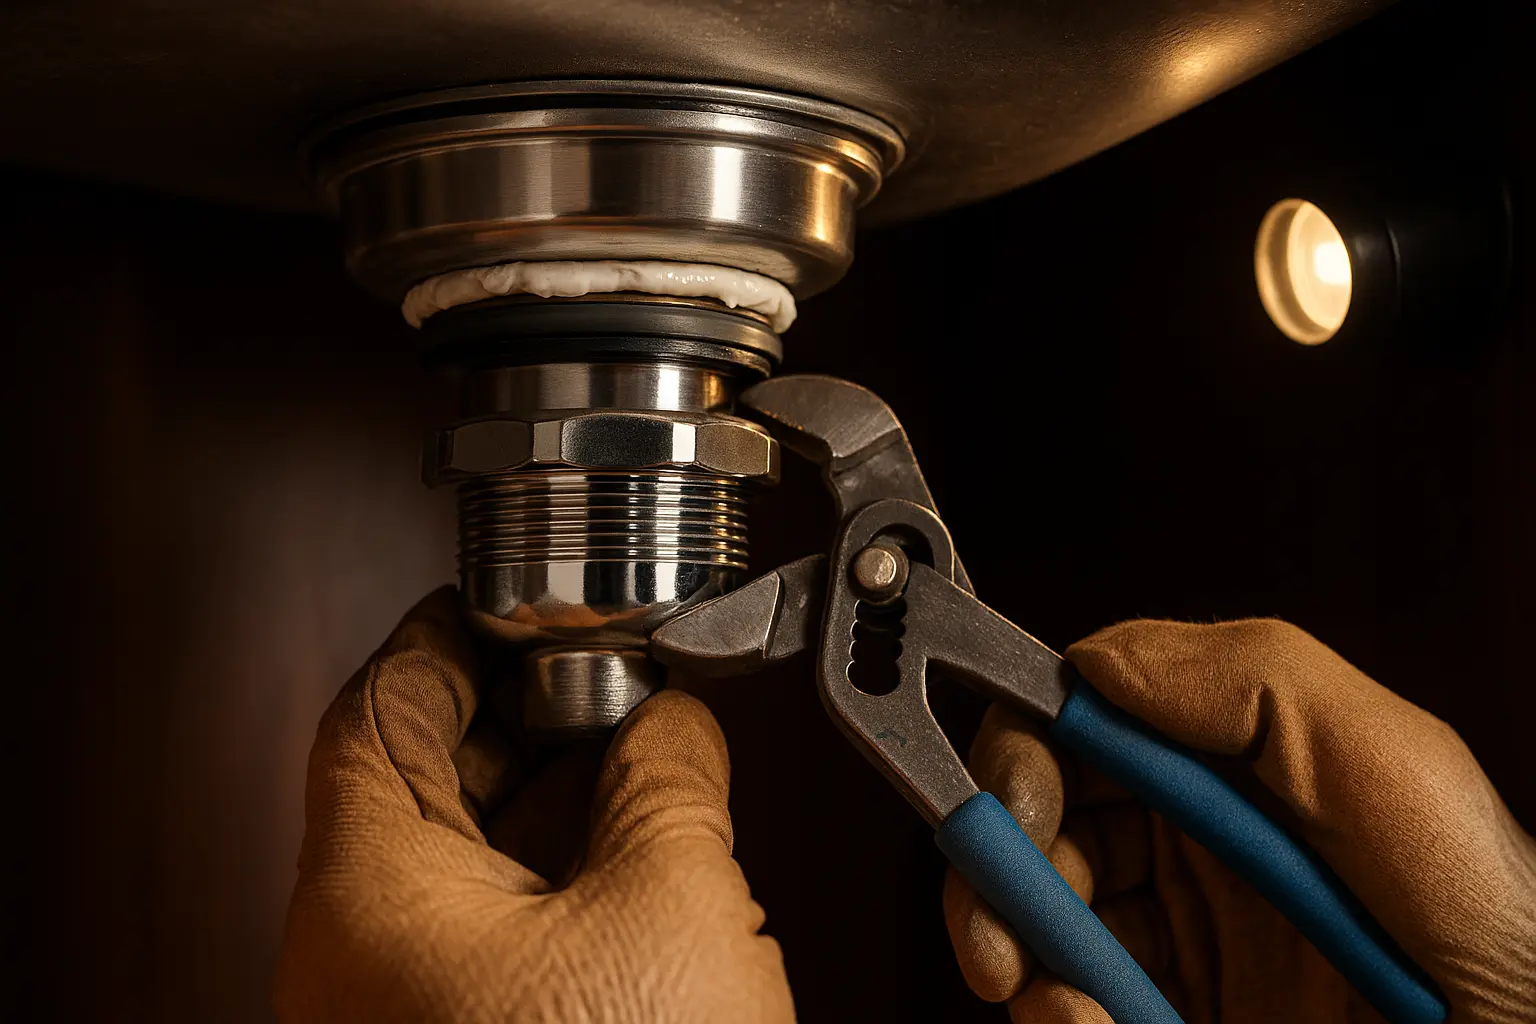
Step 4: Install the New Strainer Basket
Roll a length of plumber's putty into a rope about as thick as a pencil and wrap it around the underside of the new strainer flange. Press the strainer firmly into the drain opening from above. Excess putty will squeeze out around the edges, which is exactly what you want.
From below, slide the rubber gasket and friction ring onto the threaded portion of the strainer, then thread the locknut on and tighten with your wrench. Snug is the goal. Overtightening can crack the strainer or damage the gasket.
Step 5: Reconnect the Tailpiece and P-Trap
Attach the tailpiece to the bottom of the new strainer, hand-tightening the slip nut with a fresh washer in place. Then reconnect the P-trap, making sure the trap arm slopes slightly down toward the wall drain. Wrap a couple of layers of Teflon tape on any threaded metal connections to help prevent leaks.
Step 6: Test for Leaks
Turn the water back on and let it run for a minute. Fill the sink halfway, then release the water all at once to put pressure on the drain. Watch every joint closely with your flashlight. If you spot a drip, tighten the nearest slip nut a quarter turn at a time until it stops. Wipe away excess putty around the flange with a damp cloth.
Common Mistakes to Avoid
- Skipping the plumber's putty. This is what creates the watertight seal between the strainer and the sink. Do not rely on the gasket alone.
- Overtightening the locknut. Plastic strainer assemblies in particular can crack under too much torque.
- Reusing old gaskets and washers. Always use the new ones that come with your replacement kit. They are cheap insurance against future leaks.
- Forgetting to align the strainer. If you have a basket strainer with a stopper, make sure the crossbars are oriented so the stopper drops in cleanly.
When to Call a Professional Plumber
Not every kitchen sink job is a weekend project. Reach out to a trusted local plumbing team when:
- The drain pipe inside the wall is damaged or corroded
- You have a garbage disposal that needs to be removed and reinstalled
- Leaks persist even after replacing the drain assembly
- You see water damage on the cabinet floor or surrounding drywall
- The clog returns within days, which often indicates a deeper line issue you can read more about in our guide on how outdoor debris and sediment cause stubborn drain blockages
If water is actively pouring out, do not wait. A burst supply line or backed-up sewer can flood a kitchen in minutes, and that is when around-the-clock emergency plumbing help makes all the difference.
Keeping Your New Kitchen Sink Drain in Top Shape
Once your new drain is installed, a little maintenance goes a long way. Avoid pouring grease, oil, or coffee grounds down the sink. Run hot water for thirty seconds after every use to flush residue. Once a month, pour a kettle of boiling water mixed with a tablespoon of dish soap down the drain to break up buildup before it settles.
Water quality also plays a role. Hard water leaves mineral deposits that narrow your pipes over time, which is why some households consider a whole-home water filtration setup. If your faucets are not flowing the way they used to after the repair, check our breakdown of what causes sudden pressure drops at the tap.
Final Thoughts
Replacing a kitchen sink drain is one of the most satisfying DIY plumbing projects you can take on. With the right preparation, the job comes together in less than an afternoon, and you walk away with a leak-free sink that should last for years. Work methodically, use new gaskets and putty, and stop the moment something does not look right.
If the job runs into something unexpected, you do not have to figure it out alone. FKRIV Plumbing & Heating Inc. serves homeowners and businesses throughout the area, including Warrington, Richboro, and Horsham. Give us a call at (215) 874-0592 and we will take it from there.