Few home improvement projects feel as satisfying as replacing or installing a sink drain yourself. Whether you just finished a new bathroom vanity, swapped out an old kitchen sink, or you are finally fixing that slow, leaky drain under the counter, putting in a proper drain assembly is a skill every homeowner benefits from learning. Done right, the job takes an afternoon, saves you a service call, and leaves you with plumbing that actually works the way it is supposed to.
This guide walks you through what sink drain plumbing involves, the tools and parts you will need, and a clear, step-by-step process you can follow at home. We will also cover the common mistakes that cause leaks and slow drains, and the moments when it makes more sense to bring in an experienced professional instead of pressing on.
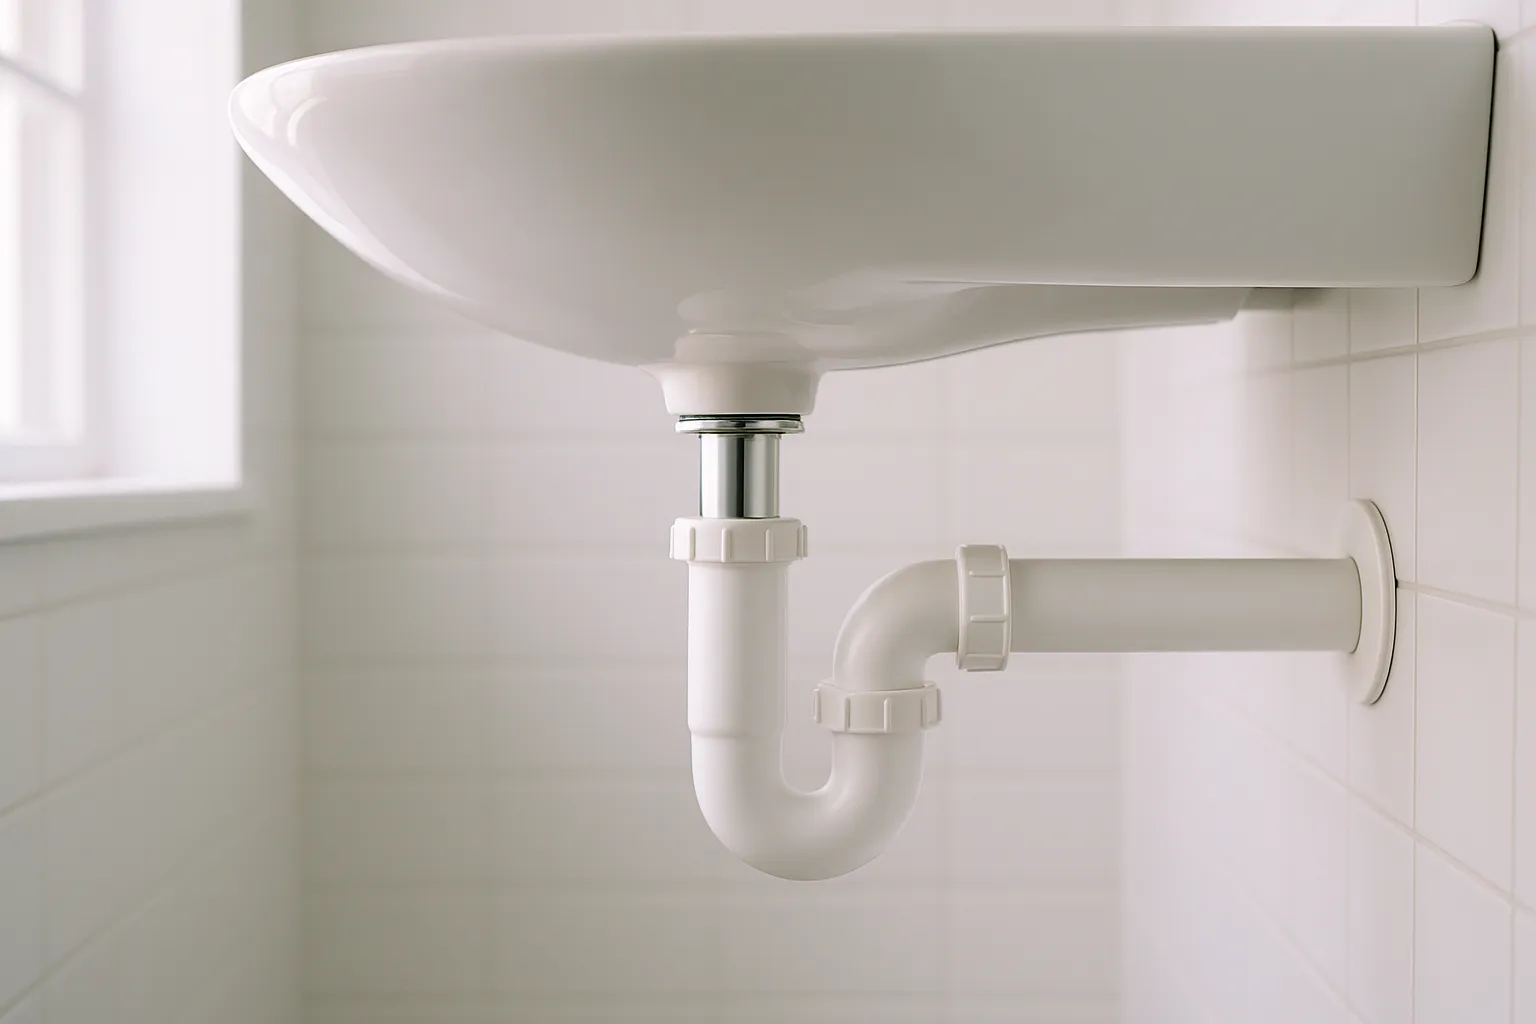
Understanding How a Sink Drain Works
Before you pick up a wrench, it helps to understand what you are actually installing. A typical sink drain is a simple system made of a few connected parts that work together to carry wastewater out of your home while keeping sewer gases from drifting back in.
The Main Components
- Drain flange and strainer – The metal piece you see at the bottom of the sink basin.
- Tailpiece – A short vertical pipe that drops from the strainer.
- P-trap – The curved section of pipe that holds a small amount of water to block sewer gases.
- Trap arm – The horizontal pipe that connects the P-trap to the drain line inside the wall.
- Slip nuts and washers – Threaded fittings that let you tighten connections by hand.
Every sink uses some version of this setup. Kitchen sinks with two basins add a tee fitting to merge the drains, and bathroom sinks include a pop-up stopper mechanism. Once you can picture how water flows from the strainer down through the trap and out to the drain line, the installation itself becomes much more intuitive.
Tools and Materials You Will Need
Gathering everything before you start saves trips to the hardware store and keeps the project moving. Most of these items are inexpensive and worth owning if you plan to handle basic plumbing work going forward.
Tools
- Adjustable channel-lock pliers
- Basin wrench (essential for kitchen sinks)
- Hacksaw or PVC cutter
- Bucket and old towels
- Flashlight or headlamp
- Measuring tape and marker
Materials
- New drain assembly or kit matched to your sink
- PVC P-trap and trap arm (1-1/4" for bathroom, 1-1/2" for kitchen)
- Plumber’s putty or silicone sealant
- Thread seal tape (PTFE)
- Replacement slip-joint washers
If you are unsure which pipe size your home uses, take the old trap with you when you shop. Matching the existing drain size prevents a lot of frustration later.
Step-by-Step: How to Install Sink Drain Plumbing
With your tools ready and the area under the sink cleared out, you are set to begin. Work slowly, keep the bucket in place, and do not overtighten anything.
Step 1: Shut Off the Water and Clear the Lines
Turn off the hot and cold supply valves under the sink. Run the faucet briefly to release any remaining pressure in the lines. Place a bucket under the P-trap to catch the standing water you are about to release.
Step 2: Remove the Old Drain Assembly
Loosen the slip nuts on the P-trap by hand or with pliers, then carefully pull the trap off. Unscrew the tailpiece from the strainer. For the strainer itself, use a basin wrench or locknut wrench to remove the large nut underneath the sink. If years of grime make things stubborn, a scraper and penetrating oil help.
Take this opportunity to clean the underside of the sink. Residue, rust, and old putty will interfere with the seal on your new drain if you leave it.
Step 3: Install the New Drain Flange
Roll plumber’s putty into a rope about the thickness of a pencil and press it around the bottom edge of the new drain flange. Set the flange into the drain opening from above, pushing down firmly. From below, slide on the rubber gasket, then the friction ring, and finally thread on the large locknut. Tighten it by hand first, then snug it up with a wrench. Excess putty will squeeze out around the flange — wipe it away with a damp cloth.
Step 4: Attach the Tailpiece
Thread the tailpiece into the bottom of the drain flange. Hand-tighten, then give it a quarter turn with pliers. Do not force it. PVC threads are easy to strip, and the slip nut further down will do most of the sealing work.
Step 5: Connect the P-Trap
Slide a slip nut and washer onto the tailpiece, then fit the P-trap’s vertical arm onto it. Connect the horizontal trap arm to the drain stub in the wall, adjusting the length of either piece with a hacksaw or PVC cutter if needed. The trap should sit level, with the curved section holding water at the bottom. Tighten all slip nuts by hand — this is important. Overtightening cracks the nuts and causes the very leaks you are trying to prevent.
Step 6: Test for Leaks
Turn the water supply back on and run both hot and cold through the faucet. Fill the basin halfway, then pull the stopper and let it drain all at once — this puts real pressure on the connections. Feel each joint with a dry hand or paper towel. Any dampness means a slip nut needs a slight turn, a washer is out of place, or the putty seal needs a reset. It is normal to chase one or two small drips on a first install.
Common Mistakes to Avoid
Most sink drain failures come down to a handful of avoidable errors. Watching for these will save you a repeat project six months down the road.
- Overtightening slip nuts. Plastic threads crack under too much torque. Hand-tight plus a quarter turn is the rule.
- Skipping the plumber’s putty. The flange seal is what keeps water from seeping between the sink and the drain basket. Do not skip it.
- Mismatched pipe sizes. Forcing a 1-1/2" trap onto a 1-1/4" tailpiece with extra washers almost always leaks.
- Reversing the P-trap. The curved side goes down, then up — installing it backward destroys the water seal that blocks sewer gases.
- Using old washers. Rubber and nylon washers compress over time. Always use fresh ones that came with the new kit.
If you finish the install and the drain still runs slowly or gurgles, the issue may be downstream rather than at your new connections. Persistent slow drainage often points to a problem in the branch line itself, and that is where hydro jetting and camera diagnostics help identify what a DIY install cannot fix.
When to Call a Plumber Instead
A straightforward drain swap is well within a motivated homeowner’s reach. Some situations, though, are worth handing off from the start. Call a licensed plumber when you run into any of these:
- The drain stub coming out of the wall is broken, corroded, or made of old cast iron that flakes when you touch it.
- Multiple fixtures in your home are draining slowly at the same time, which points to a main line issue.
- You smell sewer gas even after the trap is full of water.
- You are moving the drain location as part of a remodel, which involves venting and code considerations.
- Water is backing up into the sink from somewhere else in the house.
Issues like those usually go beyond the sink cabinet. A plumber who can run a camera into the line will spot the real cause quickly, and there are professional drain clearing options available that address buildup, roots, and pipe damage a standard snake cannot reach.
For more involved work — relocating a drain, replacing a corroded trap arm inside the wall, or bringing older plumbing up to code during a remodel — a licensed plumbing team can handle the permitting and venting details so your install passes inspection the first time.
Keeping Your Sink Drain in Good Shape
A well-installed drain can last for years with very little attention. A few simple habits keep it flowing freely:
- Run hot water for 15 to 20 seconds after doing dishes to flush oils down the line.
- Avoid pouring grease, coffee grounds, or starchy food waste into the sink.
- Clean the pop-up stopper every few months — the hair and soap scum that collect there cause most bathroom sink slowdowns.
- Check under the sink once a season for any signs of moisture around the slip nuts.
Many slow drains have nothing to do with the fixture and everything to do with sediment buildup inside your pipes. Understanding how that develops over time helps you prevent recurring clogs long before they show up under your sink.
It is also worth paying attention to how the faucet above your new drain behaves. A sudden shift in household water flow often signals a related issue elsewhere in the system, and catching it early saves a bigger repair later.
Final Thoughts
Installing a sink drain is one of those small wins that pays off every time you use the kitchen or bathroom. Take your time, work clean, and do not be intimidated by the parts under the sink — it all connects in a logical, forgiving sequence. When the project goes beyond a basic swap, or when the drain refuses to flow no matter what you do, a local plumber can solve it quickly and make sure everything below the sink is ready for years of daily use.