Whether you're replacing an old vanity, upgrading your bathroom, or tackling a fresh installation, knowing how to plumb a bathroom sink correctly can make the difference between a leak-free installation and a soggy cabinet. This guide walks you through the entire process — from the drain assembly to the supply lines — in plain language that any homeowner can follow.
That said, if you run into unexpected pipe configurations, corroded valves, or you're just not sure you want to go it alone, licensed residential plumbing professionals are always just a call away.
What You'll Need Before You Start
Gathering your materials ahead of time saves you multiple trips to the hardware store. Here's what the typical bathroom sink installation requires:
Tools:
- Adjustable wrench
- Channel-lock pliers (slip-joint pliers)
- Pipe wrench (for older, corroded connections)
- Teflon tape (plumber's tape)
- Utility knife
- Bucket and towels
Materials:
- Pop-up drain assembly with stopper
- P-trap kit (1-1/4" or 1-1/2" depending on your drain)
- Flexible supply lines (braided stainless steel recommended)
- Plumber's putty or silicone sealant
- Shut-off valves (angle stops) — if not already installed
- Escutcheon plates — if your supply lines exit the wall
Take a moment to check your home's shut-off valves before beginning. If the valves are stuck, corroded, or leaking, address that first — installing a new sink with a compromised valve is likely to cause problems down the road.
Step 1: Turn Off the Water Supply
Before you touch a single pipe, shut off the water supply to the bathroom sink. The shut-off valves are typically located under the sink — one for hot, one for cold. Turn them clockwise until they stop.
Once closed, turn on the faucet to bleed pressure from the lines. Have your bucket ready, because some residual water will drain from the existing supply lines when you disconnect them.
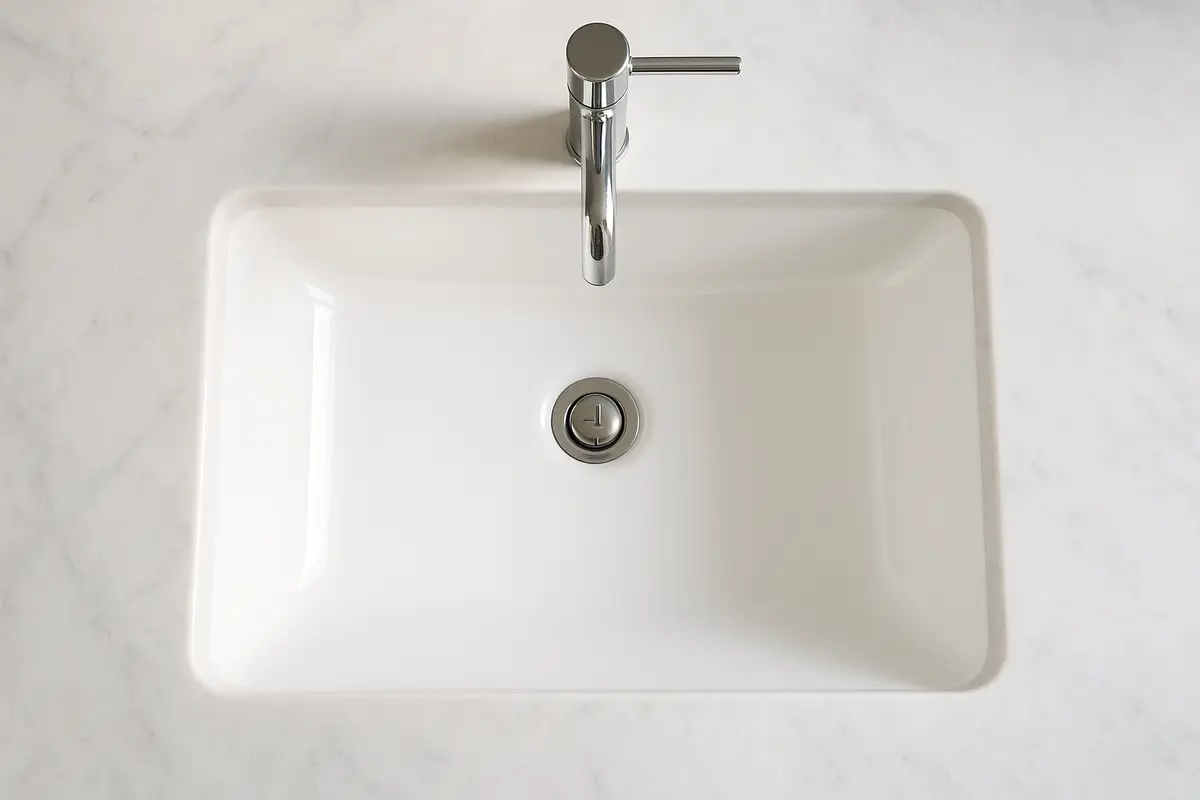
Step 2: Install the Faucet
If you're working with a new sink, it's much easier to install the faucet before dropping the sink into the vanity. Follow these basic steps:
- Insert the faucet body through the pre-drilled holes in the sink.
- From underneath, hand-tighten the mounting nuts, then snug them with an adjustable wrench. Do not overtighten — cracking a porcelain sink is easier than you think.
- Connect the faucet supply hoses to the faucet inlets (hot to the left, cold to the right). Most modern faucets include flexible supply lines with pre-attached connectors.
A Note on Faucet Hole Configurations
Single-hole, 3-hole (4-inch spread), and widespread (8-inch spread) are the most common configurations. Always verify that your faucet matches the number of holes in your sink before purchasing.
Step 3: Install the Drain Assembly
The drain assembly connects the sink basin to the P-trap. Most bathroom sinks use a pop-up drain, which allows you to raise and lower the stopper using the lift rod behind the faucet spout.
Installing the Drain Flange
- Roll a rope of plumber's putty about the thickness of a pencil and press it around the underside rim of the drain flange. Alternatively, use silicone sealant if your sink material requires it (some acrylic and composite sinks specifically call for silicone, not putty).
- Press the flange firmly into the drain hole from the top of the sink.
- From underneath, slide on the rubber gasket, friction ring, and mounting nut — in that order — then hand-tighten. Use pliers to snug it, turning just enough to squeeze the putty or sealant into a tight seal. Wipe away any putty that squeezes out from the top.
Connecting the Pop-Up Stopper Mechanism
Thread the pivot rod through the opening in the drain body until it catches the ball attached to the stopper. Secure it with the retaining nut — finger-tight plus a quarter turn with pliers. Connect the clevis strap to the pivot rod and attach the lift rod through the back of the faucet body, then clip the clevis strap to the lift rod. Test the stopper movement before moving on.
Step 4: Set the P-Trap
The P-trap is the curved section of pipe that holds standing water to block sewer gases from entering your home. It's one of the most critical components of any sink installation, and it's also one of the most common sources of leaks when done incorrectly.
The P-trap isn't just another fitting; it creates a water seal that prevents unpleasant sewer gases from traveling back through the drain and into your home. Without that seal, odors can easily escape through the sink drain.
If you've ever noticed slow drainage or foul odors in a bathroom, a poorly fitted or clogged P-trap is often to blame. Our team handles clog removal and drain restoration when a simple DIY fix isn't cutting it.
P-Trap Installation Steps
- Slide the slip-nut and washer onto the drain tailpiece (the straight section coming down from the drain assembly).
- Connect the curved J-bend of the trap to the tailpiece, then attach the trap arm (the horizontal section) to the wall stub-out.
- Ensure the trap arm enters the wall stub-out with a slight downward pitch — about 1/4 inch per foot — to promote proper drainage.
- Hand-tighten all slip-nuts first, check alignment, then snug everything with slip-joint pliers. Never crank down hard — the plastic threads strip easily.
Important: Make sure the water seal in the trap is between 2 and 4 inches deep. A trap that's too short can lose its water seal and allow sewer gases into the home.
Step 5: Connect the Supply Lines
Now it's time to bring the water in. The supply lines run from the shut-off valves under the sink up to the faucet inlets.
- Wrap the threads of the shut-off valve outlet with two to three wraps of Teflon tape, winding in the direction of the threads.
- Attach the supply line to the shut-off valve. Hand-tighten, then snug with an adjustable wrench. A quarter to half turn past hand-tight is usually sufficient for braided stainless lines.
- Connect the other end of the supply line to the faucet inlet. Repeat for the second line.
Braided stainless steel supply lines are worth the small additional cost over plain plastic lines — they're far more resistant to kinking, cracking, and eventual failure. Always use new supply lines when installing a new faucet; never reuse old ones.
Step 6: Test for Leaks
Before you celebrate and put your tools away, run a thorough leak test:
- Slowly open both shut-off valves and let the supply lines pressurize.
- Run both hot and cold water for at least 60 seconds.
- Check every connection point: the faucet inlets, supply line fittings, drain flange, P-trap slip-nuts, and the trap arm at the wall.
- Dry the area under the sink completely, then place a paper towel under each connection. Check after a few minutes for any moisture.
- Fill the sink basin fully, then release the stopper. Watch the drain and P-trap connections as water flows through.
A small drip at a plastic slip-nut usually means the connection just needs a bit more snugging. A drip at a metal compression fitting may need Teflon tape re-applied. If you encounter a stubborn leak or a connection you can't stop from dripping, don't ignore it — even minor leaks cause mold and cabinet damage over time.
When you need backup fast, emergency pipe and fixture repairs are available around the clock.
When to Call a Licensed Plumber Instead
Not every bathroom sink installation is straightforward. Here are situations where it's smarter to bring in a professional:
- Your shut-off valves are corroded, stuck, or leaking on their own.
- The drain stub-out in the wall is the wrong height or offset for the new P-trap configuration.
- You discover galvanized steel pipe, which is common in older homes and prone to severe internal corrosion.
- The new sink has a different hole configuration than the old one, requiring tile or countertop modification.
- Water damage, mold, or soft spots under the vanity cabinet suggest a pre-existing leak.
Our full-service residential and commercial plumbing solutions cover everything from simple fixture swaps to full bathroom remodels and new construction rough-ins.
Keeping Your Bathroom Sink Running Right
Once your sink is installed, a little routine maintenance goes a long way:
- Run hot water for 30 seconds after each use to flush soap and toothpaste buildup from the drain.
- Use a drain strainer to catch hair before it reaches the trap.
- Check under the sink every few months for early signs of drips or moisture.
- If the stopper starts draining slowly, the pivot rod clevis clip likely needs adjusting — it's a two-minute fix.
- Schedule a professional inspection for any fixtures more than 10 years old.
Staying on top of routine household plumbing maintenance can extend the life of your fixtures significantly and prevent the kind of hidden water damage that's expensive to remediate.
While you're thinking about water management in your home, it's also worth ensuring your basement drainage is in order — a properly working water removal and basement protection system protects the whole house, not just the areas you can see.
More Helpful Plumbing Resources
Explore these related articles from the FKRIV blog for more practical guidance:
- How Plumbers Detect Hidden Water Leaks in Homes
- How to Fix a Pinhole Leak in a Copper Pipe: Complete Guide
- Explore All Plumbing Tips & Updates
Frequently Asked Questions
Can I plumb a bathroom sink myself, or do I need a plumber?
Most standard bathroom sink installations are within reach of a handy homeowner. You'll need basic tools and a few hours. However, if you encounter old piping, corroded valves, or unexpected configurations, hiring a licensed plumber prevents costly mistakes.
What size P-trap does a bathroom sink use?
Most bathroom sinks use a 1-1/4-inch P-trap. Some older or larger sinks use 1-1/2 inch. Check the diameter of your drain tailpiece before purchasing — the trap must match.
Do I need plumber's putty or silicone for the drain flange?
It depends on your sink material. Plumber's putty works well for porcelain and most ceramic sinks. For acrylic, composite, natural stone, and some solid-surface sinks, clear silicone sealant is recommended to avoid staining or chemical damage.
How do I know if my P-trap is installed correctly?
A properly installed P-trap should have a water seal between 2 and 4 inches, a slight downward slope on the trap arm toward the wall, no visible leaks at the slip-nut connections, and all joints hand-tightened plus a quarter to half turn — never over-torqued.
How long does it take to plumb a bathroom sink?
An experienced DIY homeowner can typically complete a bathroom sink installation in 2 to 4 hours. If you're replacing an old fixture and encounter stuck shutoffs or corroded drain connections, add extra time. A professional plumber can usually complete the job in under 2 hours.
Why does my newly installed sink drain slowly?
Slow drainage right after installation usually means the P-trap arm doesn't have enough downward pitch, a blockage from installation debris is in the line, or the pop-up stopper is adjusted too low. Check your pitch first, then clean the stopper mechanism.